
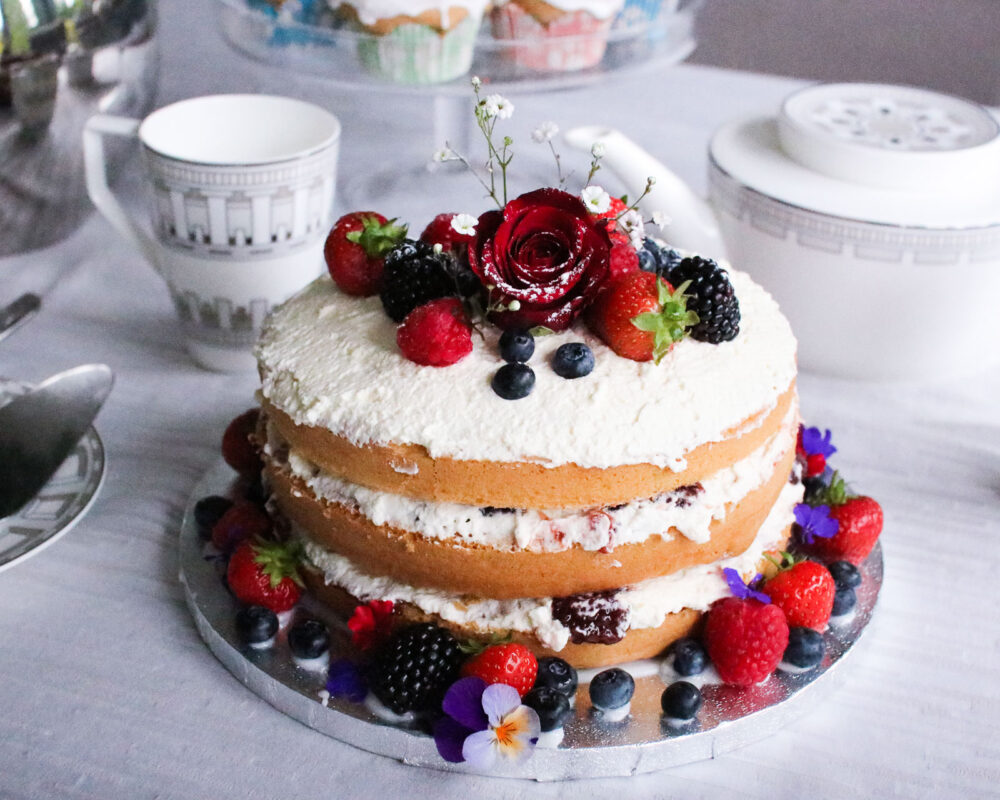

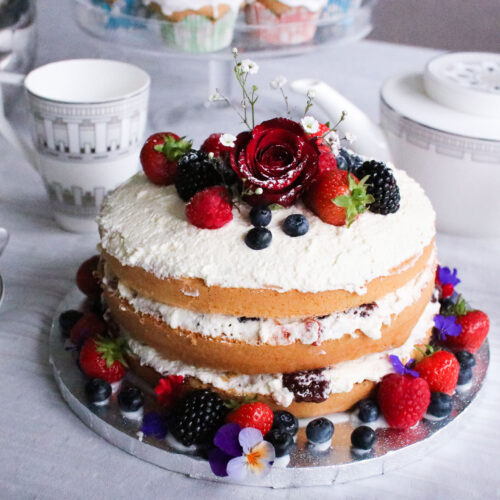
I made this rustic, Pinterest inspired cake for my Grandmother’s birthday a few months back which she absolutely loved and when I posted a picture of it on instagram it seemed to be very popular on there too! So today I thought I’d share my fail-safe recipe for a Victoria sponge cake and also some tips and tricks for making it look rustic + pretty!
Ingredients
8oz butter or margarine
8oz caster sugar
6 medium sized, room temperature eggs
12oz self raising flour
2 tsp vanilla essence
1/2 tsp baking powder
1 large pot double cream
Strawberry or raspberry jam
Mixed berries of your choice
Selection of fresh flowers
Equipment
3 sandwich cake tins (I used 9 inch tins, but you could use any size)
Cake board or large plate
Food mixer or processor
This recipe makes a sort of double batch of cake mix – so you will have some left over after you’ve filled the cake tins. I just made some simple cupcakes with the rest of the mixture – but you could use more sandwich tins to make the cake taller. It’s up to you!
For the fresh flowers, theres no need to go out and buy a huge bunch of flowers from the supermarket just for this cake. I actually found (or you could say foraged!) these flowers in my back garden, so get a bit creative and see what you can find on your own doorstep!
Method
- Preheat your oven to 180 degrees & grease the sandwich tins with a little oil or butter. If you have it, some baking parchment at the bottom of the tin will really help!
- Cream together the butter & sugar until the mixture is completely combined. You want it to become really creamy & lose the sugary texture.
- Gradually add in the eggs & flour whilst mixing. Add in the vanilla essence and baking powder after it’s all combined & continue to mix on a low speed.
- Pour your mixture equally into the tins and smooth the tops with a knife. Pop into the oven for around 15 minutes & then check to see if they are cooked through. They may need another 5 minutes but it’ll just depend on your oven.
- While the cakes are cooling, whip together the double cream with a little bit of caster sugar (around a tbsp). You want it to be quite firm – if your cakes haven’t cooled enough yet by the time you’ve made the cream pop it into the fridge for a while. You don’t want it to go runny!
- Now it’s time to build the cake. Place the bottom cake on the plate or cake board & spread over some jam and then a layer of cream. Continue like this on the other layers & then top the cake with a thicker layer of cream.
- Now it’s time to decorate! As you are working with fresh cream, I’d recommend working relatively quickly before the cream melts. But not to worry – it is really quite simple to make these rustic-style cakes look pretty!
- In terms of decoration tips – I started with the largest flower as the centre-piece of the cake and then just sort of worked my way out from there. I liked scattering the blueberries in any open areas as I thought it looked pretty but a bit effortless at the same time!
- I also stuck on some berries and flowers with a little bit of icing that I quickly mixed up (just icing sugar + water) onto the cake board to finish off the look of the cake.
- I’d advise keeping the cake in the fridge until you plan on tucking into it – you don’t want that cream to start running! Other than that, you’re all done. It may look like a really elaborate cake but it is quite simple, it’s just all about the decoration.
Let me know if you give it a go! I think it’s a great option as a birthday cake for someone who isn’t a big fan of super sweet icing or just as a special afternoon tea treat. If you’re interested in baking take a look at my pinterest board here for lots of inspiration for future bakes!


